Your first automation
This walkthrough builds a simple automation that is still useful. When someone comments PRICE on your posts, Tuku sends them the price in a DM and replies to the comment in public.
It takes about five minutes.
Before you start
Section titled “Before you start”- Your TikTok account is connected, and the connection checklist shows no failed checks.
- The account has at least one published post.
- You have one product you want to promote.
- Your role can edit automations. Owners, Admins and Managers can. Agents, Billing Managers and Viewers can only view them.
Step 1: Start a new automation
Section titled “Step 1: Start a new automation”- Open Automations from the sidebar.
- Click New automation from scratch.
- Type a name you will recognise later, like
Price reply — Hydra Serum. - Click Create & Open Editor.
The editor opens. Your automation is not saved yet: the header shows a Not saved yet badge until you click Save Draft or Publish for the first time. If you leave before that, Tuku asks you to confirm, and nothing is kept.
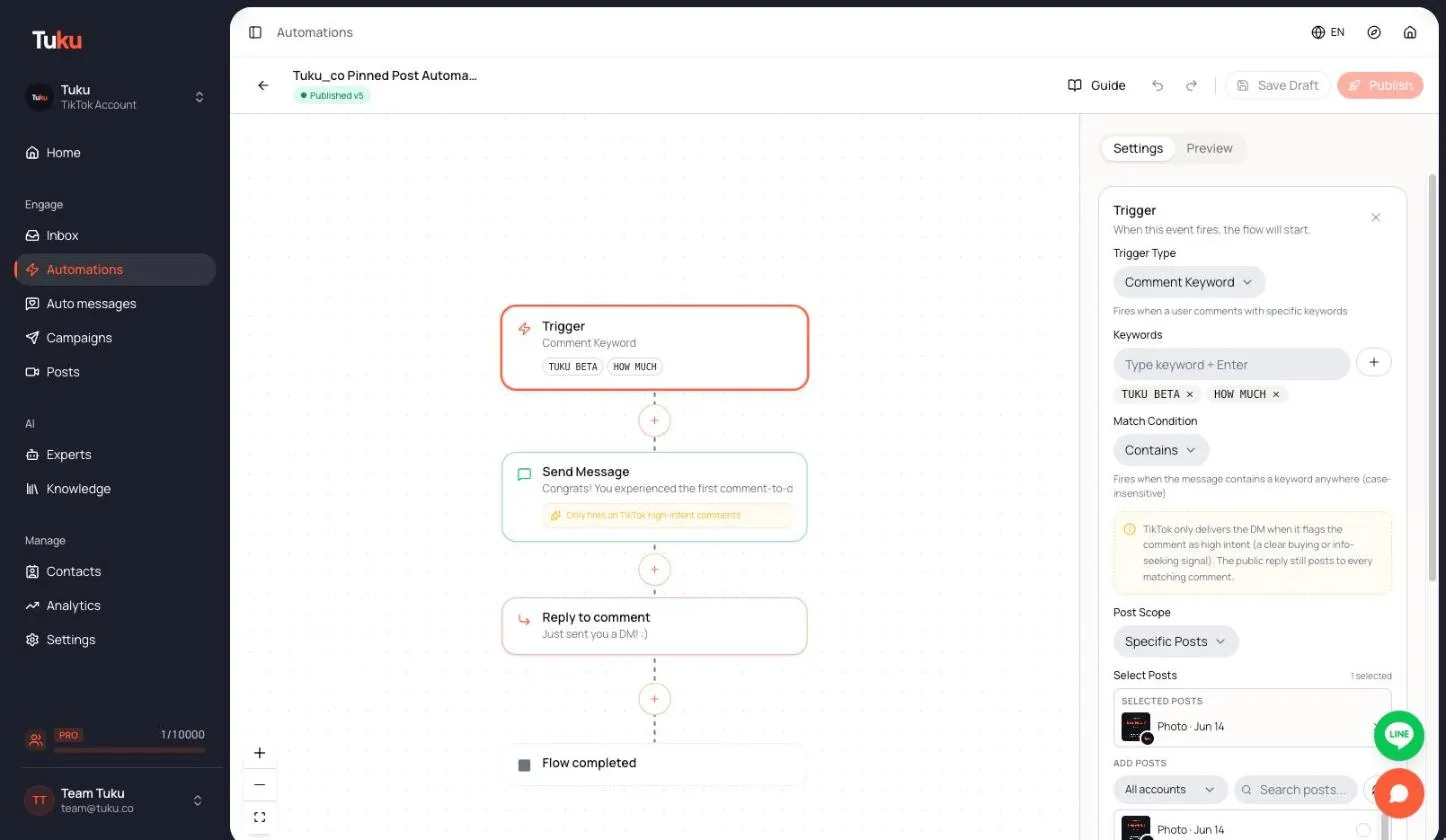
An automation has a trigger (when it starts) and a flow (the steps it runs). You build both on the same canvas. Click a step on the canvas to edit it in the Settings panel. The Preview tab shows what the customer will see.
Step 2: Set the trigger
Section titled “Step 2: Set the trigger”Click the Trigger step on the canvas. Then:
- Set Trigger Type to Comment Keyword.
- Under Keywords, type each keyword and press Enter:
PRICE,ราคา,เท่าไหร่. - Leave Match Condition on Contains.
- Leave Post Scope on All Posts. You can pick Specific Posts later.
- Optional: under Comment actions, turn on Like the comment.
Step 3: Write the DM
Section titled “Step 3: Write the DM”- Click the + under the trigger and choose Send Message.
- Write the DM. Use your real product words:
Hi! ราคา Hydra Serum 30ml คือ ฿890 ค่ะ 🌿 สนใจสั่งซื้อ พิมพ์ “สั่งเลย” ได้เลยค่ะ เดี๋ยวแอดมินช่วยดูแลต่อ
In a comment automation, the first message must be a text Send Message step. TikTok delivers only that one message until the customer replies.
Step 4: Add the public reply
Section titled “Step 4: Add the public reply”- Click the + under Send Message and choose Reply to comment.
- Write a short reply, for example
ส่งรายละเอียดให้ทาง DM แล้วนะคะ ✨.
Put the reply after the DM. If TikTok does not deliver the DM, the flow stops, so the reply never promises a DM that was not sent. See Reply to comment.
Step 5: Publish
Section titled “Step 5: Publish”Click Publish. If something is missing, Tuku lists what to fix first. After publishing, the header shows Published v1 and the automation is Active on the Automations list.
Step 6: Test with a real comment
Section titled “Step 6: Test with a real comment”- From a second TikTok account (or a teammate’s), comment
ราคาon one of your posts. - Open Inbox. If TikTok let the DM through, you see a new conversation with the DM your automation sent.
TikTok only allows a DM for comments it judges as high intent. A test comment may not qualify. In the editor Preview, switch Delivery scenario to DM not delivered to see what happens then. Read Who actually gets a DM.
If nothing happens, see Troubleshooting.
What to do next
Section titled “What to do next”| You want to… | Read |
|---|---|
| Start from a ready-made automation | Automation templates |
| Reply on more posts, or only some posts | Comment triggers |
| Ask a question and branch on the answer | DM flows |
| Let a teammate handle a tricky chat | Human handoff |
| Greet new followers automatically | Auto messages |